This blog documents the restoration, and conversion, of a 1965 Humber (Singer) Vogue to a fully electric vehicle. The Vogue will be powered by an 11kW(modified), 3 phase industrial AC motor, controlled by an industry standard Variable Speed Drive (VSD) or Inverter. To be able to produce the 400 volts phase to phase the VSD will need about 600 VDC of batteries. A big thanks to the contributors on the AEVA forum: http://forums.aeva.asn.au/forums/

Monday, March 26, 2012

Front Seat fabric did not fit

Try as we might, we were unable to make the front seat upholstery fit properly. The problem is that we had allowed too much fabric on the top of the corners. This was because the fabric (upholstery) was designed around the old seat vinyl before I had applied the new foam to the seat.
So with much sighing, Laurel sat down and unpicked the top of the seated part from the front section.


Picture is the front section missing.


No wonder we couldn't make it fit. This is how much fabric was removed.
We pinned it back to the foam, Laurel tacked it - checked it again, then re-sewed it.
Now it's a perfect fit.
I can now get on with copying the pattern (reversing left-to-right) for the other front seat, then installing this seat's fabric.

Wednesday, March 21, 2012

Humber Vogue Story

For anyone who might be interested, there is a great historical article featuring the Australian Humber Vogue here.

Rear seat installed

It's temporary as it will have to come out to fit seatbelts and finish the black vinyl trimming, but a real confidence boost for us that it still fits perfectly AND the silver bits line up! We even sat in it for a few minutes - very comfortable as they give a little bit unlike modern seats - kind of like the lounge chair of car seats.

Tuesday, March 20, 2012

Rear Seat fabric fully fitted

The seating part of the rear seat is now all but finished.
The original seat had a method of securing the vinyl to the front of the seat base that we couldn't replicate easily. They had a 1500mm plastic 'U' shape sewn to the bottom of the vinyl which was then clipped over the 5mm wire frame edge.
Here is how it was originally done.

I originally thought of using clips then covering them with pinchweld but while I was at Clark Rubber a few weeks ago they had a pinchweld profile that had a 6mm clearance at the rounded part. So the clips were not necessary - we simply hold the fabric on with the pinchweld.

Here it is partially fitted with my good old butterfly clips holding it in place until I get to that bit.

Here, I am fitting the last section - just hold the fabric tautly and push down hard - removing clips as I go. It was pretty hard on the thumbs.

The finished product - well almost. I just have to make the two fabric covers for the lower part of the base. They are on a cardboard base and just folded over at the edges and glued around the wire frame
 

These have to be recovered in blue velour.

Monday, March 19, 2012

Rear Seat Upholstery clipped up

Some new excuses for not getting much done this past weekend. On Saturday I slept away the afternoon having come down with a flu-like something. On Friday and Saturday night my son (William) was in a school musical (Little Shop O'Horrors). There was a Saturday matinee but I didn't go to that one.  I wasn't feeling too bad on Sunday so I got something done.
I finally clipped up the back and base of the rear seat.

I didn't use standard auto upholstery clips as were used on the vinyl as they have little "teeth" that would have torn the velour if/when I tried to remove them.
Instead I used these stainless steel clips I found at Officeworks a few months ago. They are sold under the brand "Nalclip". I slightly modified each clip with a pair of needle nose pliers so that the edges are bent up (takes about 6 seconds/clip). That way they don't cut the fabric going on. Top one is modified. (I'll change this photo for a macro one later.)


Unfortunately the applicator was pretty useless as the stuff I am clipping to is only just inside the clips width, but they are easy enough to get on by sliding a screwdriver into the gap.

Friday, March 16, 2012

Window saga and Seat foaming

The windscreen rubber and rear 1/4 light window saga is not over yet.
When we went to fit the stainless steel trim to the windscreen rubber, it was way too wide. The Vogue appears to be different to other Rootes Group cars (Hillman) in that the front and rear windscreen seal trim is a different width from front to back.
Front trim. The new front windcreen rubber allows about 8mm where this measures 11mm.
The rear which is on the car. This trim width would fit the front.
My supplier in Adelaide is going to supply a plastic chrome trim that will fit.
I also sent the rear 1/4 light seals back to him to have them shortened on two sides. When we get them back we will try one last time to fit them and if not successful I'll get "someone" in to do it.

Meanwhile I am still applying rubber foam to the front passenger seat. We are fiddling with it a lot to get a really nice comfortable yet confining seat. It's also a fiddle to get the upholstery to fit.
More soon.

Monday, March 12, 2012

Rear Seat upholstery glued down, Driver's side window in

Actually gluing the upholstrey down under the silver section was another job we really didn't want to do. It turned out fine. I couldn't get good pictures and I think I'll wait until they are in the car to get better ones.
I fitted all the bailey channel, outside weatherstrip and the inside felt strip. The window regulator (winding mechanism) isn't in yet but the window slides nicely.
There's glass in that door!

Front Passenger Seat Foam

I tried to order the foam the right size but they are all a bit on the big side.
Out with the electric carving knife again.


Seat foam re-cut, now for some glue on the base.

This was our poor lounge room today. Sorry family... I use the old foam and vinyl as a reference quite a lot. It will be good to pack it off to under the house (in big plastic bags - just in case we need to do this again) when the seats are finalised.
The foam almost done. I still have to place the 10mm foam over the 20mm to get the "plush" effect. The back of the seat isn't glued to the seat frame - I may not need to.


View from above showing the contour of the back part of the seat.

Friday, March 9, 2012

Front Passenger Seat Back Elastic Fitted

Back in this post I indicated that I was buying some elastic webbing to replace the old rubber diaphragm on the upright part of the passenger front seat.
Well I came home early today and made some progress.
 First I fitted my vice to the workmate, then one by one, cut each piece of elastic and clamped the ends.


The fancy rubber cutters (orange handled things) I bought  a year ago for this kind of thing weren't much use, hence the scissors (to the left of the strap). Thats' one...


Then, seeing as how I have misplaced my pokey tool, I used a 12V circuit tester to poke the hole through the elastic - the clamp already has a hole in the centre - how convenient.


Then insert one of the original wire hook thingys (someone please tell me what to call them) in both ends and...


One done.


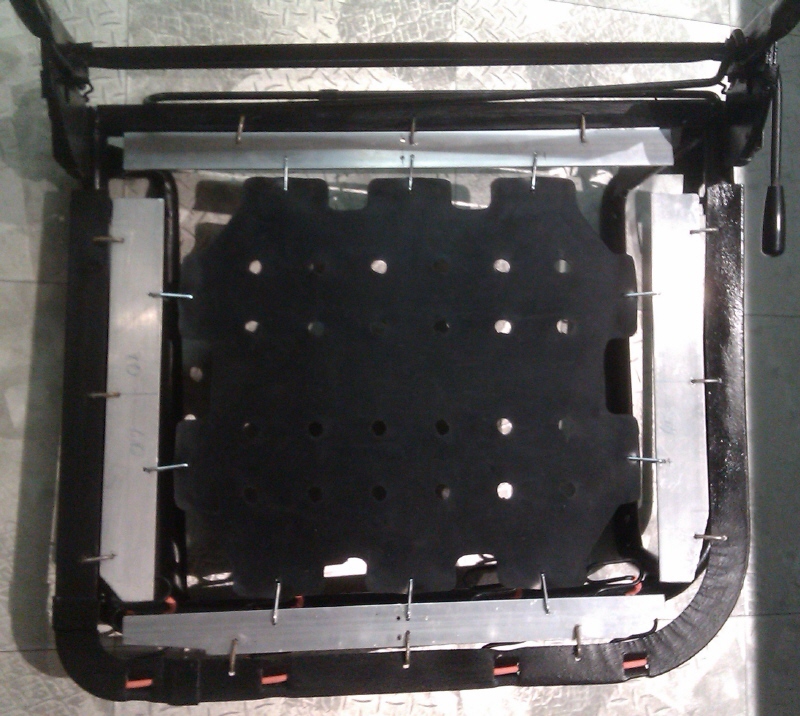
All done - then I even had time to blog it. I only finished about 20 minutes ago.

By the way - this is how I determined the length of the elastic.
I measured the distance hole to hole for each of the seven strap positions on the seat.
Then I fiddled around pulling and testing the elastic and figured that I wanted a typical 500mm piece of webbing to be made from about 430mm - that gave me what I though was the right amount of "stretch". Since the wire hook things took off about 40mm all up, the formula became.
Webbing Cut Length = (hole_to_hole - 40) * 0.86
So I cut each webbing strap to that formula.
We will have to wait for the foam to go on before we see if I was right. It's a bit firmer than the old rubber support.

Funny thing - often in these past few posts when I want to type "Elastic" it comes out "Electric".

Thursday, March 8, 2012

How to train your Dragon

No progress on the Vogue tonight as we went to this live show. The picture is the staging as we were leaving. (I hate it when people use cameras during a show.)
(Picture edited 14/Mar/2012)

Believe it or not this post is still about EVs. The floor based dragons were very realistic and were mounted on low profile vehicles that provided the motive power and power for the animatronics in the dragon's body. I wondered what kind of batteries they were using. The flying dragons appeared to contain their own power source and it was noticable that the movement of the wings and body was more limited. There was an immense amount of flying work (humans and dragons) and at times you felt that you were watching a flying circus. A great show. It helped to have seen the film as the story was a bit obscure. A narrator would have helped in places.

This is the first blog entry I have mode totally (almost) from my phone - we posted this on the way home on the train (some of these edits later). I shared the picture with Picasa then inserted it directly into the blog entry.

Wednesday, March 7, 2012

Front Seat Diaphragm Mounted

Last night saw the last two aluminium fillers drilled and in place. I'll have to pad it under the front piece of aluminium as it hits the springs when you sit on it and we don't want rattles. Otherwise it looks like it will work fine.

Closer...


The orange bits you see are orange heatshrink that I have placed over the ends of the four springs that support the front of the seat base. They used to have some kind of fabric over the ends so I figure something is required. The orange was the most durable that I had left over from the electric stuff.

Next - the webbing for the back. I discovered last night that there are actually seven webbing strap holes down either side of the back of the seat. I realised this when I was counting the remaining wire clips (same as you see in the above picture) - there were 14 left. Fortunately I bought plenty of webbing and extra webbing clips.

Tuesday, March 6, 2012

Front Seat Diaphragm Partly Installed

At about 8PM last night I went out to the garage. At 10:10PM I came back inside.
It doesn't look like two hours worth of work but there was a lot of fiddling around to get an approach right. I took the picture this morning and Xena (the rag stealer has a name) was puzzled by what I was doing.

The Triumph TR6 rubber diaphragm is secured at the front and back. I have yet to drill the holes in the side pieces of aluminium (you can see them at the front of the seat on the floor).
Close up of the front. Note the special holes near the middle to relieve the lateral pressure on the aluminium. Nah - I just stuffed up. For some reason the calculations were out by about 5mm so there wasn't enough stretch so I drilled new holes. It's a bit off centre but it won't matter.

I had to use 32mm wide aluminium on front and back but the sides will be 40mm. I really need about 45 mm because the holes will only be 7mm from the edge. It'll only matter in about 10 years if the steel links elongate the holes in the aluminium to the point where it gives way. The aluminium is as wide as I can make it to help support the 50mm foam that will form most of the seat cushion.

Friday, March 2, 2012

Bailey Channel Search

I have finally resolved the Bailey channel problem. I really have NOT been unable to track down a rigid bailey channel that is 5/8" wide and the right height with a metal trim. See this post. Laurel and I have decided that a non-rigid bailey with no trim will be acceptable.

After much reserching online, I discovered that Clark Rubber (Australian national rubber retailer) actually stocked a few of the candidates for flexible bailey channels.
I went there a couple of days ago and bought back these four samples. The one on the far left actually had little wings on the outer edges which I cut off hoping to get a better fit but it was still too large.


So numbered left to right:
#1 Too large
#2 Fits quite well
#3 Too small
#4 Too low

Number 2 works really well in the doorframe. It will have to be held in with glue at about 100mm intervals. It has the official number 350.222. Clark's price was good so I went back yesterday and picked up 7 meters.

Just a side note. The clips that hold the rigid bailey channel into the door frame were a bit rusty so ages ago, during great clip de-rust, I had cleaned them up and de-rusted them. When I tried to fit one of them into the door frame I scratched the paint on the edge of the doorframe (covered by the bailey channel we have chosen). No matter how I tried there was no way to get them in without damaging paintword. The flexible bailey won't use the the clips so I'm also happy with this approach (glue) on that front as well.

We put the windscreen rubber on the front windscreen last night. We'll give it a few days to settle in then attempt to put the windscreen in the car. If Sunday pans out then maybe then.

Thursday, March 1, 2012

Windscreen Seal #3 Arrived - Boot handle on

My third windscreen seal arrived yesterday. We didn't get time to put it on the screen last night - hopefully tonight.

To racap.
#1 Didn't have the stainless steel trim channel
#2 Wrong size - for eariler car
#3 Just arrived looks OK - a tad bigger than #1 so I hope it's OK.


On other matters, the boot handle, trim and boot rubber seal is on. (They have actually been installed for a few weeks but I hadn't taken any pictures.)