No door handles yet but getting closer. The Quarter vent (or no-draft) windows are fitted and all the doors have the side trim fitted.
We are still messing with the dashpad trying to figure out the best way to fit it (it must go in before the front windscreen). We had it in position but it will have to be secured a different way than the original due to the fibreglass shell making it a bit thicker in places.
This blog documents the restoration, and conversion, of a 1965 Humber (Singer) Vogue to a fully electric vehicle. The Vogue will be powered by an 11kW(modified), 3 phase industrial AC motor, controlled by an industry standard Variable Speed Drive (VSD) or Inverter. To be able to produce the 400 volts phase to phase the VSD will need about 600 VDC of batteries. A big thanks to the contributors on the AEVA forum: http://forums.aeva.asn.au/forums/
Friday, December 30, 2011
Rear Seat back
Here is a first look at the seat design that we have chosen. Unfortunately the light was not very good and I didn't capture the real blue colour but it shows the idea. The vinyl seat back in my previous post has the vulcanised section replaced by the silver with horizontal piecing to kind of emulate the older seat. The sewing machine decided it didn't want to top stitch on the left hand side (yesterday), so it went in today for a quick check-up. It got dropped off this morning and picked up this afternoon so more should happen tomorrow.
I concentrated on fitting the 100 or so pop riveted trim clips today. I'll put up pics when it's finished.
I concentrated on fitting the 100 or so pop riveted trim clips today. I'll put up pics when it's finished.
Labels:
Interior,
restoration,
seats
Tuesday, December 27, 2011
Seat covers begun
We will be re-foaming and recovering all the Vogue seats ourselves. We bought the fabric over a year ago and finally the work has begun. This is the back part of the rear seat. Note the horizontal vulcanising lines.
Nine pieces, each 68mm wide. We cut up two panels like this.
I have also fitted my new 1/4 vent rubbers to the vent windows - I'll take a picture for tomorrow's posts.
More tomorrow.
The rag stealer claimed a new doggy bed.
We intend to follow the general look in that the vulcanised section shown above will be silver fabric, pieced to give the same impression. The surrounding fabric is dark blue.
Here is a test piece that Laurel made up to test here "walking foot".
The rear-most piece has slightly bunched up where Laurel used a standard foot on the sewing machine. The foam backed fabric needs the walking foot to stop from bunching. We lost about 2mm over 200mm due to the bunching. Note the yellow rotary cutter seen earlier in this blog when the roof insulation had to be carved out a little bit.Nine pieces, each 68mm wide. We cut up two panels like this.
I have also fitted my new 1/4 vent rubbers to the vent windows - I'll take a picture for tomorrow's posts.
More tomorrow.
Labels:
Interior,
restoration,
seats
Fitting the Dashpad
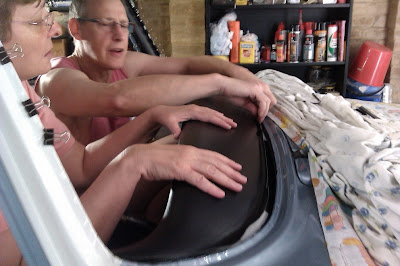
We thought is was a bit funny that Laurel and I were sitting in the car on little wooden children's chairs so we asked William (son) to take a photo. Not as funny as we thought (can't see chair) but at least the dashpad is going in. Not fitted yet - even at the end of the day - but nearly.
The determined look on ours faces in the picture below tell it all.
The determined look on ours faces in the picture below tell it all.
Labels:
dashpad,
Interior,
restoration
Thursday, December 22, 2011
Front 1/4 Light Window Rubbers Arrived
About the only rubber in the Vogue that it was near impossible to get or make are the moulded pieces that seal the front 1/4 vent windows. Fortunately for me a guy in Brisbane that does these rubber seals as almost a hobby has done them for the Vogue. It's been about a year and a half coming but they arrived yesterday.
I now have all the seals for the glass in the Vogue which means I can finally re-assemble the door inners. I should be very busy over the next week or so.
I now have all the seals for the glass in the Vogue which means I can finally re-assemble the door inners. I should be very busy over the next week or so.
Labels:
restoration,
windows
Subscribe to:
Comments (Atom)


