This blog documents the restoration, and conversion, of a 1965 Humber (Singer) Vogue to a fully electric vehicle. The Vogue will be powered by an 11kW(modified), 3 phase industrial AC motor, controlled by an industry standard Variable Speed Drive (VSD) or Inverter. To be able to produce the 400 volts phase to phase the VSD will need about 600 VDC of batteries. A big thanks to the contributors on the AEVA forum: http://forums.aeva.asn.au/forums/

Showing posts with label Interior. Show all posts

Monday, September 17, 2012

Rear Passenger Door Liner Installed

I installed most of the clips on the back of the door liner (I left the two centre bottom clips off as it doesn't need them) then cut small nicks in some plastic sheet and attached it to the door liner clips.

Then I assembled the rear door inside handle, lock rods and clips - I am not sure what I would have done if I didn't have a spare door under the house to refer to (I didn't pull the door internals out, the spray painter did so it was a bit of a puzzle which way to re-assemble the top rod).

This is the spare door under the house.


Then it took about 2 hours of fiddling just to get most of the clips to line up with the holes in the door - but it's finally on! We left about seven of the clips off as the 3 ply is a lot stiffer than the original card that Rootes used and it didn't need them - plus it made it a heap easier to get the liner on.
  View from inside the car.
I'm hoping that the remaining three will be easier.

Friday, September 14, 2012

Rear Door Liner ready for Installation

I finished gluing the fabric to the rear door liner last night.
We choose to have three 34mm strips of silver, pieced and top stitched. It took of lot of family advice to decide where to place the silver. The top part ends about 20mm under the lowest part of the armrest.

A minor mistake is that I should have inserted the 20 clips first. They go in from behind so that's not a problem but it would have been easier to place them in the correct position for the holes in the door without the fabric on the door liner.

Tuesday, September 11, 2012

Door Liners - last of the major work on Interior

Laurel sewed up the fabric for a door liner on Sunday so I bought some light-weight 6mm foam and, last night, glued it to the rear passenger side door liner. I left about 12mm at the edge with no foam. I also did not place foam under where the wood trim goes at the top.


I left it for a little while then lightly glued the fabric to the foam.

This is the first one so it's a bit experimental. I am not sure I used enough of the spray on glue. I'll see tonight. I don't want the fabric billowing out when I wrap it around and glue it (contact adhesive this time) to the other side of the panel.

Wednesday, August 29, 2012

Door Liners ready for fabric

I finished punching out the holes in the door liners and we laid one of the front and one of the rear door liners out to see how we would cover them. The rag stealer was nosing around.

Here is one without the black silhouette in the way.

The orginal liners were covered in red vinyl with vulcanizing in several strips under the armrest area.

We decided to do two or three strips of silver starting where the vulcanizing starts at the bottom but not going quite to the armrest (the two smaller holes through the vulcanized area). When we laid fabric on the liner it was apparent that, even though the fabric has a foam backing, that the backing was not thick enough - it felt cheap. I'll buy some 3mm foam backing to go behind the fabric.

At some point in the past two weeks I made the decision to use the constant current balancers on all the battery packs in the car, not just the ones that showed errors on the drive - I just didn't mention it here. I have been moving the balancer chargers from pack to pack as each pack got to 59 VDC (3.69 x 16). Every pack has taken more than two days to reach internal cell balance - thats about 9AH (for a 20AH cell pair). The packs were certainly not correctly charged. The last two battery packs are on the 180mA constant current balancer chargers now - nearly there!

Tuesday, July 31, 2012

Hi to Humber UK - Glovebox

My stats tell me that the Humber UK forum has discovered the Electric Vogue blog. Hi guys. You are welcome to leave comments (just be nice).

I painted out the inside of the glovebox liner last night ready to put a new vinyl bottom in it. I have used this Bristol vinyl paint for a few things now - great stuff!

I also installed the glovebox door's handle and lock and I'm trying to figure out what screws go where to hold the dashboard in the car.
I have to clip the rag stealer (poodle) tonight so not much will get done. We are pretty much on track to do the major test drive on Friday (if I take the day off which is on the cards).

Monday, July 23, 2012

Interior Trimming - Pinchweld Installation

I finished and installed the centre pillar trim on Saturday.
I then spent an amazing amount of time trimming and gluing down bits that I hadn't noticed until I was ready to install the pinchweld (furflex/windlace). I bought the pinchweld from Basis in New Zealand.
This is the top part of the centre pillar trim showing the connector for the interior light and seat belt mounting hole. I hadn't glued it down at this point.

The lower part is in blue.

We changed fabric just level with the top part of the door linings (yet to be done). The top, grey fabric is the headlining fabric, the lower blue is the seat and door liner (yet to be done) fabric.

Having the pillar trim on allowed me to get on with installing the pinchweld - that's the stuff that clips around the body seams where the door closes. When we renewed the pinchweld on the Super Snipe we cut 45 degree angles on the right angle corners and I have never been that happy with the job. On one of the MGB forums someone had indicated that the correct way was to hammer the stuff into the corners and get as small a radius as possible - but it wouldn't be perfect. I cut of a piece and tried that and it wasn't very good. The metal parts of the pinchweld poked out through the fabric.

A note here that the cheaper plastic pinchweld is a LOT easier to install as it is quite easy to cut at 45 degrees. The "furflex" style that I have used is a metal spine with automotive fabric wrapping as you will see in the pictures.

So the technique I settled on was to unpeel the fabric partly, cut the metal at a right angle, then re-seat the fabric and cut a 45 degree angle in just the fabric. The result is great.
Here it is in picture form.
 
First spread the pinchweld a little and dig out the fabric - releasing it from the internal barbs.

Peel the fabric back to get it out of the way.

Snip of the metal part - I my case I need at least 12mm of fabric hanging over the end.

Re-seat the fabric (stuff it back in and ensure it gets snagged by the barbs).

Cut the fabric at a right angle 12mm from the metal (to neaten it up) then cut it at 45 degrees. MAKE SURE you get the right orientation of the angle. (Me, stuff it up first time? Nah!)

The final result - I had to lighten this picture up a lot to see the black which made the join look a lot worse than it really is.
One bit I didn't mention is that I used a permanent black marker to colour the grey lining of the fabric at the cut ends.

I haven't finished but I have made a good start and now have a system going. So far I have done both sides of the car, down the back and across the top of the rear doors.

Both Saturday and Sunday the temperature in the garage went from 12 degrees C to 14.5 mid-afternoon, then 12 again at the end of the day. It hit 12 at about 6PM both days- that's when I called it a day/night.

Friday, July 20, 2012

Interior Lighting

Since I've owned the Vogue I have never had the correct dome light for the inside. Since they look pretty rubbishy anyway, and I would have had to cut a hole in our precious headlining, I had decided a couple of years ago to not have a centre dome light.

Instead I have two LED "running" lights on either side of the car mounted on the centre pillar just above the front seat belt mounting points. These are the same type as I used for the number plate light (whoops - I never posted that) except they have a chrome clip on trim instead of a black surround.

The number plate light.

It replaces the normal single bulb version that was getting very tired - the rubber was perished. I haven't shown it lit here but it puts out more light than the incandescant bulb did and lights the number plate really well. I have a few more of these LED lights - I intend to use them for engine bay and boot lighting.

I had to add a mounting point for the bottom screw (circled in blue) - that was a saga - I dropped one down into the passenger side pillar and took 45 minutes retrieving it.


They are held in place with Sikaflex and bear against the inner wall of the centre pillar panel when the light is mounted. The Sikaflex just holds them until the trim and light is installed.
The red arrows point at the mounting holes.
The LED lights have a 60mm lead on them that plugs into the connector in the centre pillar to make for easy installation.

Tuesday, July 17, 2012

Last Pieces of Vinyl Trim Done

The final two pieces of vinyl trim are cut and glued, ready to go in the car. The butterfly clips that were used way back when we installed the headlining have been invaluable when gluing vinyl to corflute. (Underside shown.)


This is where one of these pieces gets fitted.

Monday, July 16, 2012

Interior Vinyl Trim Fitted

I spent most of Friday (last day of a week off from work) fitting the interior vinyl which covers the bodywork under the doors and the sides of the front and rear footwells.

Rear passenger side (left). I still have the trim for the vertical pillar in between the doors to fit. That piece is velour fabric and will go on when the furflex (windlace/pinchweld) is fitted.

Front driver side (right) with paint cans and wooden sticks holding glued pieces in place. You can see the driver side footwell trim piece on the transmission hump.

Driver side again with handbrake cowl in place and footwell trim installed. I have used velcro to hold the front footwell trim in place so that I can add wiring from the doors to main body easily (speakers, central locking etc,.). The grey wiggly carpet thing on the floor is underlay, cut to take out the bumps in the Vogue floor. The bumps were designed that way for some reason. Once the carpet goes in it should be a nice flat floor with a reasonably "plush" feel underfoot.

Passenger side carpet underlay with extra at the front to lift the carpet another 10mm.

Passenger side footwell trim.

I still have to cut two more pieces of corflute for above the footwell trim. Normally this is covered by the parcel shelf but I am not putting that back in initially - I'll velcro these pieces in as well. There is a bit of work in making a new backing for the shelf so I'm deferring it for now. The parcel shelf fitting also impacts on car radio fitting and the mounting of extra controls below the standard dashboard.

Hi to Vic from the Yahoo Humbercars group.

Friday, June 29, 2012

Motor Coupler "nipped up".

One of the things on my to-do list was to tighten the M12 bolt that holds the motor coupler to the 38mm motor shaft (after it had been taken off then put back on again). I was reticent to use anything that would scratch the nice red paint job on the coupler.

So last night we fired up the controller, reduced the maximum RPM to around 50 RPM and I put a torque wrench on the bolt while William (13 yr old son) pressed the accelerator until I said "STOP" - at around 70NM.

Ya gotta love motors that develop torque at 0 RPM.
Sorry, no pictures, I was a tad busy and it was too cold under the car to do a set-up shot.


I also wasted some time copying the front footwell trim cardboard to corflute to find out the fit was terrible (the original was the problem).


The blue is what I cut away to make it fit and the red is what I have to add.

I'll do them again.

Monday, June 4, 2012

Door Weatherstrip does not fit

I bought the rubber doorseal for all four doors from a supplier in England together with the carpet near the end of 2011. Unfortunately the doorseal doesn't fit. It does fit in the channel on the door but the door will not close - the leading edge fouls against the car body on all doors.
Here is a sketch indicating why.
Blue is the door.
Black is the sponge rubber seal.
Green is te car's body.

I have a feeling it's going on eBay!

If that wasn't enough - the rear window outer weatherstrip is a problem too. I already had two pieces for the front but had to buy two for the rear doors at around $40 $30 each.
This is the front door - this one works well.

This is the rear door - note the height that the weatherstrip goes up the glass compared to the picture above.

And here is the problem. This is what happens when you wind the window down. The weatherstrip follows the glass down into the door.

I have only cut one of the rear weatherstrips so with any luck I can get a changeover or a refund.

On the good side, I have finished preparing all the vinyl trim and will begin to install it in the car. I have one more piece of trim to do - the section in-between the front and back doors. It has my modified inside lights and the seatbelt mount. We are going to do this piece in headlining fabric down to the bottom of the glass then blue velour to the bottom of the door - it's black vinyl under that.

Wednesday, May 30, 2012

Interior Vinyl trim

I have finished making the vinyl trim pieces for the interior except for the front footwell panels. These are the ones at the side of the footwells just in front of the front doors. I will have to get the parcel shelf from under the house, where it's been stored for about 12 years, before I can finalise the trim.

I have discarded all the cardboard that was originally used as stiffening and used 3mm coreflute - a kind of corrugated plastic sheet. I used the original cardboard as a basis for the shapes to cut out of the coreflute but I was surprised at how often I had to modify ill-fitting shapes.

I haven't fitted the trim yet - except for the pieces next to and just in front of the rear seat.

This isn't the only piece but it gives an indication of the almost-finished trim (no pinchweld yet).

Thursday, January 26, 2012

Gearbox Hump Underlay and Carpet

I cut up the underlay/insulation for the transmission hump and tailshaft tunnel and velcroed it on today. In this picture I have yet to make the little "hat" that fits over the inspection cover.
 I then "fiddled" with the carpet that I bought from England for a couple of hours to make it fit. It still needs a bit of padding but is essentially done.

Sunday, January 15, 2012

Floor Leveling and Underlay

Back in 1965 it apparently was not very important to have the floor of the car "flat". The Vogue floor has always annoyed Laurel because it has contour lines made by the metal pressing - probably for strength. These lines caused the old carpets to wear out quickly where the floor dipped and rose. So part of Sunday went to making two templates for the underlay so I could level the floor.
The driver and passenger sides are a little different. That's about the point when I realised that I shouldn't finalise the floor underlay until I had done the underlay/insulation for the transmission hump.
My passenger side template. Since taking the photo I extended the template up the firewall further just next to the hump.

Firewall Insulation Installed

I spent a couple of hours Sunday morning making a template then cutting the firewall sound proofing material. I'm not sure why it's needed now considering I haven't got a ticking wheezing Petrol Engine under the bonnet any more. It's got to go in before the heater is installed.

Before. This is looking in the left hand front door toward just under the dash area where the glove box will be installed.


After
I still have a little more to place around the heater inlet area but it's all clipped in and easily removed for engineering checks. I also realised that I can't install the heater until the transmission "hump" insulation is installed - that's next.

Rear Seat Foam Rubber

I dropped into the upholstery supply place Friday morning and ordered the foam for the rear seat. It was ready for pick-up after 1PM that day . Cost AU$52 - many pieces cut to size.
It made the extra can of 3M 76 Hi-Tack spray adhesive look expensive at $27.


Rootes Group didn't even bother to prime the raw steel sheet in the seat frame. Didn't they realise that the car would have to last more than 47 years? The seat foam we have removed was still in good enough condition to re-use (if you were that way inclined). Good quality stuff.


On Saturday I de-rusted the seat frame in preparation for putting the foam and fabric on.

We didn't get the foam on the seat as we had an outing on Sunday but I got some other stuff done.

Wednesday, January 11, 2012

Rear Seat fabric almost finished

All we need to sew on now is the fabric section that goes around the front of the seat and the fabric part is finished.
I have dismantled the back section but we need to pull the lower section (of the original vinyl seat) apart , get new foam, and re-assemble. Sounds simple doesn't it?
I'll post better photos (not done with my phone like this one) when it's on the seat frame.

Sunday, January 8, 2012

The Dashpad in In!

It's finally in.
It took me all day Saturday and Sunday - well a few breaks but that was my weekend - why?

The Vogue dashpad was not based on any kind of solid liner. It consists of foam and vinyl. For that reason it cost a lot to have this one made with a fibreglass base that fits the dash top.
Unfortunately the person who made it wasn't a clairvoyant or have magical abilities so it didn't fit quite right. The problem is that the demister trim and side wooden trim didn't fit.

I secured the wooden trim and drew a blue line on both sides to indicate how much room I had.


Now with dashpad installed. The circled bit is fibreglass and foam and will have to come off.


So I spent a long time hacksawing, snipping and filing VERY carefully to make evereything fit.
Here is the final result.


The little buckle is a trick of the light. It's there but very slight. I can take it out with the heatgun or just leave it to the windscreen rubber and sunlight.

Friday, January 6, 2012

Seat Foam Woes

I thought it wa going to be a simple matter to get the new foam rubber for the seats - not so.
A trip to Clark Rubber revealed that anything that would last longer than 10 years was a "special order". So we are waiting for the auto upholstery shop that we bought the fabric from to open on Jan 9th. The rear seat fabric will be ready to go by early next week. Meanwhile we are.hoping to get the dashpad in tomorrow. Pics tomorrow.

Friday, December 30, 2011

Rear Seat back

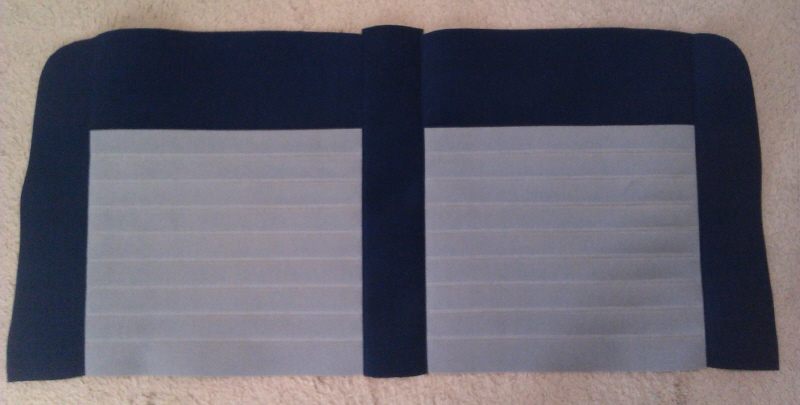
Here is a first look at the seat design that we have chosen. Unfortunately the light was not very good and I didn't capture the real blue colour but it shows the idea. The vinyl seat back in my previous post has the vulcanised section replaced by the silver with horizontal piecing to kind of emulate the older seat. The sewing machine decided it didn't want to top stitch on the left hand side (yesterday), so it went in today for a quick check-up. It got dropped off this morning and picked up this afternoon so more should happen tomorrow.
I concentrated on fitting the 100 or so pop riveted trim clips today. I'll put up pics when it's finished.