
Thursday, December 18, 2014
Range by Month to mid December 2014
October was hotter than normal, November dropped a bit and the Vogue's range followed.
Monday, October 27, 2014
Letter to Engineer in 2012
I wrote this letter to the Engineer (that approved the Vogue) in January 2012 prior to his first visit.
It's actually one of the best summaries of the car - something lacking in the blog until now.
I began converting the Vogue to electric and restoring it about 2 1/2 years ago.
The Humber Vogue Mk3 (1965) is a medium sized sedan that was powered by a 1600cc overhead valve engine coupled to a Borg Warner 35, 3 speed automatic transmission. Made in Australia by the Rootes Group, the Vogue is very similar to the Hillman Minx of the era.
The Vogue has front 9" disc brakes with no booster, no power steering and no air conditioning. These things make the electric part a lot easier as there is no need to power a separate steering pump, vacuum pump or air conditioner pump. The Vogue is still registered and has been continuously for the past 47 years. I have owned it for about 17 years and driven it about 50,000km on the old engine.
The Vogue is now powered by a nominal 11kW induction motor (3 phase ACIM) that has been rewound to a lower voltage with high temperature windings, embedded thermister, independently powered cooling fan and shaft encoder. The motor can develop around 65kW peak and since the continuous rating of 11kW was at 1500 RPM, the manufacturers concur that it can comfortably maintain 22kW at 3000 RPM.
The motor is coupled directly to the tailshaft which has been custom modified to include a sliding spline.
The motor is driven by a Lenze 9329 DC to 3 phase Variable Speed Drive (controller) which in turn is powered by 384 Lithium Iron Phosphate cells arranged in 2 parallel 192 series to deliver around 600 VDC. The cells are packed into 12 battery subpacks of 32 cells each (2P16S). Each cell is 3.2 V, 10AH. Each sub-pack has it's own 3A charger.
Each sub-pack weighs 12kg. The accelerator is an Audi A6 pedal (new) and feeds a custom configuration in the controller that provided a very petrol engine-like "feel" with full Torque control. Being an AC system the Vogue has very powerful and configurable regenerative braking.
The entire battery pack is isolated from the car chassis and has a vacuum contactor at either end of the pack that is rated to break maximum voltage and current. In addition there are two contactors that isolate the center of the pack from a nominal "center" connection (required for the DC-DC 13.8 V convertors of which there are two). The control system will not allow the car to "start" unless it is in Neutral and the Charger is disconnected.
For the purpose of wiring layout and identification I generally refer to a +300V and a -300V side of the pack.
The packs can be broken into six isolated sections with hand-safe connectors and that is how I work in the vehicle.
The 12 chargers are sequenced on in four stages to avoid large mains inrush (in 2 second intervals). The car draws 2400 W from a 240 VAC supply. The mains supply inlet is protected with a combined 16A RCB/MCB.
The seven front battery sub-packs are split into four mounted on a 1.6mm stainless steel tray which is mounted on the firewall and to the front inner guards. The other three subpacks are on the motor frame. The motor frame mounts on the original engine and rear transmission rubber mounts.
Four of the rear five subpacks are mounted on an aluminium frame which is secured to the Vogue "upper" boot area immediately behind the steel rear firewall. The fifth rear subpack is securely mounted where the Vogue guard-mounted fuel tank used to reside.
All 12kg battery subpacks are secured with 300kg polypropylene camlock straps (Lion brand). The three front motor frame mounted subpacks have two straps each. All metal corners where straps are involved are rounded to a radius just short of the metal thickness, finished with 1200 grit wet-and-dry and, if aluminium or mild steel, painted.
While I did not weigh the car before starting, I did measure the ride heights of front and back, right and left sides, and have documented all weight removed and added to the vehicle. So far it is about 6kg lighter than original. A great deal of effort has been made to keep the weight distribution the same as original which meant "stuffing" as much as possible into the engine bay. For instance, my original design had six subpacks in the front and six in the boot but this was changed to seven in the front and five in the boot to move as much weight forward as possible (battery packs are light compared to cast-iron engine blocks).
There are very few places where I have had to drill new holes as the Vogue provided extensive mounting points. There has been no steel cut from the vehicle (other than drilled holes).
The Vogue has been professionally resprayed and is currently having a completely new interior fitted. The steering box has been professionaly overhauled and the car is entirely rust-free.
I have tried very hard to adhere to NCOP14 throughout the design and implementation of the conversion.
The "electric" or conversion part of this project has been 99.9% finished and drivable since July 2011 - the restoration has taken somewhat longer than I envisioned.
If I have left anything relevant out, a complete, up-to-date (and time consuming to read) build blog is available at:
http://electricvogue.blogspot.com/
Navigation is easiest and fastest if you use the "Labels" on the right of the page to pinpoint any specific areas of the build.
Tuesday, September 16, 2014
Monthly Energy Usage to Spring 2014
I have deferred the front end work until I have time to clean up the wishbones etc.
Meanwhile, I am getting good range figures now that it's warmed up a little here in Melbourne.
Here is the up-to-date range history since I have been driving the Vogue on electricity.
Range is based on 80% Depth of Discharge (DOD) of the battery pack.
The anomaly in October 2013 was caused by two high speed trips raising the average of only eight recharges. June 2013 had only five recharges. I normally recharge about 20 times a month in winter (every weeknight) and about 15 times a month in Summer.
Edit: Updated 28th October 2014
Tuesday, September 9, 2014
Vogue about to clock up 10,000km on Electric Power
My range is creeping back up now it's over 15 degrees C in the morning.
I quickly took this picture on the way to work. I had another 5km to go. The over-100km-projected-range didn't last long as I was about to go up a big hill - nice to see though.
(Range is Remaining Range - I should rename it sometime.)
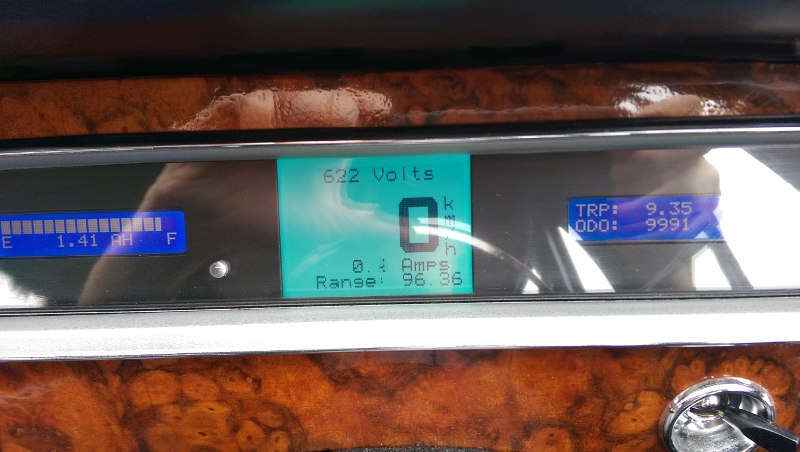
So on the way home I'll go over the 10,000km.
I quickly took this picture on the way to work. I had another 5km to go. The over-100km-projected-range didn't last long as I was about to go up a big hill - nice to see though.
(Range is Remaining Range - I should rename it sometime.)
So on the way home I'll go over the 10,000km.
Friday, September 5, 2014
CSIRO on Man made Climate Change
Wednesday, August 6, 2014
Record for longest EV range at Highway speeds
No, it's not the Vogue...but this is pretty great.
http://www.wired.com/2014/08/eve-solar-powered-car-record/
http://www.wired.com/2014/08/eve-solar-powered-car-record/
Poodle playtime and Vogue passes 9000km
The Vogue passed 9000km on battery power at the start of this week.
Meanwhile the Rag stealers play...
Meanwhile the Rag stealers play...
Thursday, July 17, 2014
Power to the People
[Soapbox on]
A recent Four Corners (a credible Australian current affairs TV show) explored the utterly stupid Australian government's bias against renewable energy development.
I really do not understand what the LNP (current government) think they are doing in this country.We are losing so much to a lie that the economy is in trouble and matters more than anything else.Australia is turning into the "bad guy", pushing it's coal when it should be planning and "doing" for a very doable sustainable future.
The discussion over electricity companies being in trouble from not "predicting" the private rooftop generation and renewable energy effect just points to a blinkered dumb attitude that failed to do basic research into clear trends. This is not "wise in retrospect". Many people predicted this and took action - just not some Australian power companies.
Of course this is just my opinion.
Four Corners article.
 (We always need a picture.)
A recent Four Corners (a credible Australian current affairs TV show) explored the utterly stupid Australian government's bias against renewable energy development.
I really do not understand what the LNP (current government) think they are doing in this country.We are losing so much to a lie that the economy is in trouble and matters more than anything else.Australia is turning into the "bad guy", pushing it's coal when it should be planning and "doing" for a very doable sustainable future.
The discussion over electricity companies being in trouble from not "predicting" the private rooftop generation and renewable energy effect just points to a blinkered dumb attitude that failed to do basic research into clear trends. This is not "wise in retrospect". Many people predicted this and took action - just not some Australian power companies.
Of course this is just my opinion.
Four Corners article.
Tuesday, July 8, 2014
The Rag Stealer gets a Playmate
Well not quite a playmate yet, she (the older dog - Xena) is still at the growling if-you-come-near-me stage. We have high hopes though. The new dog is SO much like Xena was when she was a pup - naughty.

The Vogue is going strong - still waiting for the front end work but in no great hurry - other stuff has moved to higher priority (new kitchen floor, new puppy) so it's better to wait for couple of weeks.
The Vogue is going strong - still waiting for the front end work but in no great hurry - other stuff has moved to higher priority (new kitchen floor, new puppy) so it's better to wait for couple of weeks.
Sunday, June 22, 2014
Spare Front Springs Cleaned and Painted
I took a little bit of time over the weekend (Laurel says a lot of time), to wire brush, clean and paint the spare set of front springs for the Vogue.
Wire brushing them wasn't much fun. Here they have been wire brushed already.
Next was a coat of rust converter.
 I also cleaned, rust converted, primed and painted the un-bent spare front anti-sway bar.

Then a coat of etch primer and a top coat or two.

Now I know that no-one likes to leave comments but is this colour too "loud". I still have time to paint them black.
They are a bit darker then it looks here. The Flash lit them up.
It's the same paint I used on the rear brake drums.
I read on some 4x4 and street car forums that it's a complete waste of time painting coil springs - oh well - they'll look better for a little while.
Wire brushing them wasn't much fun. Here they have been wire brushed already.
Next was a coat of rust converter.
Then a coat of etch primer and a top coat or two.
Now I know that no-one likes to leave comments but is this colour too "loud". I still have time to paint them black.
They are a bit darker then it looks here. The Flash lit them up.
It's the same paint I used on the rear brake drums.
I read on some 4x4 and street car forums that it's a complete waste of time painting coil springs - oh well - they'll look better for a little while.
Thursday, June 19, 2014
Front End work Delayed
I went to drop the Vogue in at around 5PM and the mechanics place was crowded with dead cars. They had an unexpected influx of problem vehicles. I really didn't want to leave the Vogue there with guys squeezing past it doing other work so I was quite happy just to leave it to sometime next week when the place had cleared a little.
This will give me a chance to clean and paint the spare sway bar and springs this weekend (yes I found two spare Vogue springs under the house). That way I might be able to clean and paint the wishbones on a weeknight - minimizing the time that the Vogue is dry-docked. There is always the option of not bothering the clean up the wishbones at all but Laurel (better half) says I wouldn't be happy if I did that. She's probably right.
It would be really nice to have this front end - maybe one day I'll pull it out.....
(Not mine but off a similar Rootes vehicle!)
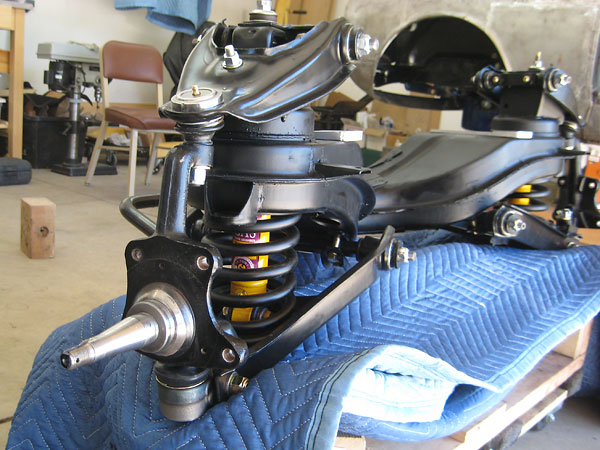
Picture from Bill Ashby's Sunbeam Alpine
This will give me a chance to clean and paint the spare sway bar and springs this weekend (yes I found two spare Vogue springs under the house). That way I might be able to clean and paint the wishbones on a weeknight - minimizing the time that the Vogue is dry-docked. There is always the option of not bothering the clean up the wishbones at all but Laurel (better half) says I wouldn't be happy if I did that. She's probably right.
It would be really nice to have this front end - maybe one day I'll pull it out.....
(Not mine but off a similar Rootes vehicle!)
I'm getting Back on the Bus tonight
No it's not a failure. The Vogue goes "over the road" tonight so that the front end can be partially dis-assembled on Friday. I'll take the Bus home tonight and bring the Super Snipe to work tomorrow so that I can pick up the parts that have been removed and spend some time on them on the weekend.
Meanwhile here is a picture of my array of SuperPro bushings.
(The bushings are missing from the lower shocker mounts packet as they are already installed in the shockers - see previous post):

Lower front shocker bush kit - SPF0718-80K
Control arm upper bush kit - SPF0730K
Control arm lower bush kit - SPF1059K
Sway bar to control arm kit - SPF1060-19K (19 is the sway bar diameter in mm)
(Control arm = wishbone)
Meanwhile here is a picture of my array of SuperPro bushings.
(The bushings are missing from the lower shocker mounts packet as they are already installed in the shockers - see previous post):
Lower front shocker bush kit - SPF0718-80K
Control arm upper bush kit - SPF0730K
Control arm lower bush kit - SPF1059K
Sway bar to control arm kit - SPF1060-19K (19 is the sway bar diameter in mm)
(Control arm = wishbone)
Monday, June 16, 2014
Converting HQ Holden Shock Absorbers to Humber/Hillman
Dampers - OK they're dampers - but most folk call them Shock Absorbers.
The Holden H series shockers fit the Hillmans, Sunbeams and Singers(Humber Vogue) of the early sixties I'm told; so I just bought a set of Ultima Shock Absorbers off an eBay seller. They look about right - a minor change is all that is needed. Remove the bottom bushing and metal attachment and replace with a suitable Hillman style bushing. I have already bought some SuperPro SPF0718-80K bushings.
Step 1
Cut around one side of the bushing where a lip has formed when the bushing was installed.
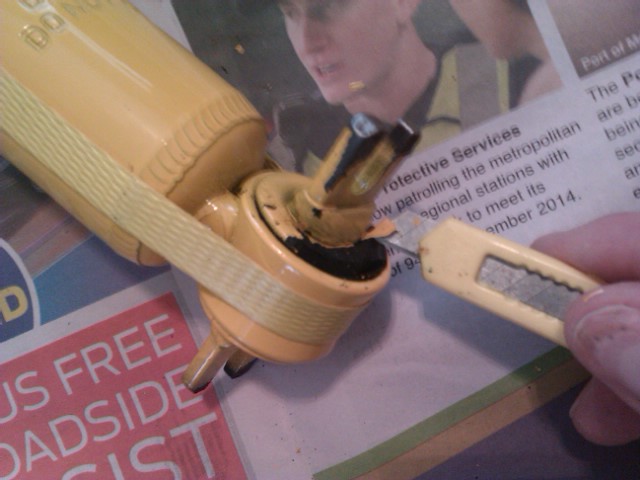 Step 2
Drill out some rubber to make removing it easier. Try not to hit the metal.
 Step 2.5
Make a mess.
 Step 3
Place the shocker on a flat board and apply pressure with foot while pulling on the metal attachment with a big pair of multi-grips/pliers. A bit of rotational force helps.
Sorry no picture for this one but here the Holden style bushing has been removed (plus the one from the first shocker I did).
 Step 4
Apply some of the supplied lubricant to one end of the new bushing.
 Ready vice...
 Step 5
Squeeze the bushing in with a vice. The rag is just so I don't take too much paint off the shocker.
 Once you reach the limit of what can be done with the vice a little heal-of-hand thump seats the bushing nicely.

 All done.
The Holden H series shockers fit the Hillmans, Sunbeams and Singers(Humber Vogue) of the early sixties I'm told; so I just bought a set of Ultima Shock Absorbers off an eBay seller. They look about right - a minor change is all that is needed. Remove the bottom bushing and metal attachment and replace with a suitable Hillman style bushing. I have already bought some SuperPro SPF0718-80K bushings.
Step 1
Cut around one side of the bushing where a lip has formed when the bushing was installed.
Drill out some rubber to make removing it easier. Try not to hit the metal.
Make a mess.
Place the shocker on a flat board and apply pressure with foot while pulling on the metal attachment with a big pair of multi-grips/pliers. A bit of rotational force helps.
Sorry no picture for this one but here the Holden style bushing has been removed (plus the one from the first shocker I did).
Apply some of the supplied lubricant to one end of the new bushing.
Squeeze the bushing in with a vice. The rag is just so I don't take too much paint off the shocker.
Wednesday, June 4, 2014
About time for some Front End work
The Vogue's 49 year old control arm upper and lower bushes are on their last legs so I'm currently collecting parts to replace all the front end bushes - and shock absorbers.
I haven't been very happy with the knocks and squeaks that the Vogue front end has been emitting for a while, so last week, having got a ball-park price from elsewhere and not been happy with it, I visited Knox Tyrepower (over the road from work) to ask for some advice. These are the folk I spoke of here that gave the Vogue it's Silicone tyres and who mentioned in no uncertain terms at the time (point 5 in this post) that the front end was "on the way out".
As soon as I indicated why I was there, Ross took me by the arm and led me next door to the mechanics (unrelated business). They all appeared to know about the "Electric Vogue" and were keen to help out. They had a good look under the car (up on a hoist) and confirmed we needed the upper and lower wishbone (control arm) bushes renewed. This is a job I do not want to do as by the time I get someone else to press the old bushes out etc. it will become a major pain - I know I'll want to re-paint the whole front end! Spring compressors scare me too.
So this may look a bit different in a week or two.
(Knox Tyrepower has put tyres on, and aligned, all the cars in our family for a past 12 years and I have never been disappointed in their advice or workmanship - no they're not family!)
Monday, May 19, 2014
A Quick De-rust and Small Respray
Over the past couple of years, the Vogue has been developing a small crease of rust where two body seams meet along the front behind the bumper bar. I have been trying to match the paint for the car but the original colour codes are unreadable due to paint drips. I have also had it for over 4 years now.


All in time to drive it to work today.
So given that the rust was becoming visible I set aside some time over the weekend to burr it out using my dremel and a miniature wire wheel, rust convert it (I actually did that stuff during the week at night), prime it, seam seal it, prime it again, then two base coats and two clear coats.
Where did I get the paint? I used supercheap auto's colour cards to get the closest match among 72,000 colours and they mixed me up an aerosol can.
I masked up 5-10mm either side of the seam as I didn't want to spray the whole lower front and the result is good - not perfect but good. You have to be looking for it.
The Vogue, missing bumper and grill, ready for clear coat. I hate overspray.
All in time to drive it to work today.
Monday, May 5, 2014
Driver's seat fixed
One Sunday I finally got around to changing out the second faulty seat diaphragm - this time for webbing. I was amazed to see from this blog that it has been over 2 months since it tore. The seat base has had some of my trusty battery pack packaging foam supporting it.

First I removed the torn diaphragm. I also removed the two aluminium pieces at the sides so I could add more holes.


 Three front-to-back straps done.

I had to temporarily un-thread the left hand front-to-back so allow me to get enough grip to stretch the side-to-side ones.
All done. The three middle side-to-side hooks are 30mm and are from the first seat diaphragm I bought - there is no reason I used them other than convenience. The Vogue originals and the ones I made were 20mm - you can see the difference.
The strange interleaving is because to front and rearmost straps would have been damaged by the webbing clamps if I had run the side-to-side trap across the bottom.

If this was being done while the seat was completely disassembled then you also would not need the aluminium pieces - just drill extra holes in the actual seat frame. Another time saver over what I did originally. The 0.8 stretch was about right for the base - I wouldn't change it.
I will post how it holds up over time but I really don't expect any problems at all as two or three straps can hold my 80kg weight easily - and there are eight.
The torn diaphragm. The steel inserts have torn out in four places at the rear of the seat (circled).
First I removed the torn diaphragm. I also removed the two aluminium pieces at the sides so I could add more holes.
I decided I would need five straps running side to side to support the foam so, fortunately, it only required three more to be drilled.
It was a bit cold in the garage so Laurel agreed that the workmate and vice could be brushed down and set up in the lounge room - together with a folding table.
First strap on. I used 0.86 stretch on the seat backs so we went with 0.8 on the base.
That is - measure the hole to hole dimension then subtract the size of the hooks and multiply the result by 0.8. Cut the webbing to that dimension.
I had to temporarily un-thread the left hand front-to-back so allow me to get enough grip to stretch the side-to-side ones.
All done. The three middle side-to-side hooks are 30mm and are from the first seat diaphragm I bought - there is no reason I used them other than convenience. The Vogue originals and the ones I made were 20mm - you can see the difference.
The strange interleaving is because to front and rearmost straps would have been damaged by the webbing clamps if I had run the side-to-side trap across the bottom.
It was a very comfy ride to work Monday and Tuesday.
Cost of the Premium Webbing plus clamps for the base was $26 - with postage from (www.diyupholsterysupplies.com.au/home/) This includes enough for the passenger seat when it inevitably fails. The webbing is also heaps easier to put on and really easy to "get it right". My advise - don't bother with the diaphragm approach at all.
Cost of the Premium Webbing plus clamps for the base was $26 - with postage from (www.diyupholsterysupplies.com.au/home/) This includes enough for the passenger seat when it inevitably fails. The webbing is also heaps easier to put on and really easy to "get it right". My advise - don't bother with the diaphragm approach at all.
If this was being done while the seat was completely disassembled then you also would not need the aluminium pieces - just drill extra holes in the actual seat frame. Another time saver over what I did originally. The 0.8 stretch was about right for the base - I wouldn't change it.
I will post how it holds up over time but I really don't expect any problems at all as two or three straps can hold my 80kg weight easily - and there are eight.
Tuesday, April 29, 2014
Tailshaft Vibration Massively Improved
Well the homebrew balancing paid off.
I couldn't feel any vibration at all at 60 km/h and it didn't become evident until I hit 77 km/hr - even then it was only just detectable on a smooth road.
The vibration must have been my speed limiter when driving a I had to watch my speed very carefully on the way to work.
So it's definitely the tailshaft so it looks like I have to find someone who will do an ultimate balance.
The hugely diminished vibration and the new rear sway bar link bushes I put in a week ago (sorry not blogged) made for a very pleasant trip to work.
I have also sealed the front windscreen across the top in the body-to-rubber interface so I'll see how that goes this week. I have had some minor leaks. (I have a tendency not to use any sealant unless I absolutely have to.)
Sunday, April 27, 2014
Some Home Brew Tailshaft Balancing
I finally devoted some time this weekend to attempting to improve the vibration issue with the Vogue's tailshaft.
I had bought a 3 axis accelerometer from eBay a few weeks ago and on Saturday I added some connectors and wires so I could select any of the 3 axis to test. I choose the 'Z' axis output set to high-sensitivity, and added some orange bluetack (yes, really) to the bottom of the PCB to hold it on the motor frame.
The bluetack colour got washed out on this picture as and appears white.

Up the Vogue went onto axle stands with the rear wheels removed for safety.
I cleaned some road dirt off the motor frame and stuck the accelerometer on.
 Then I limited the motor speed to 3500 RPM which is 87 km/hr so that the tests would be repeatable - all I have to do is floor the accelerator.
 I dug out my 38 year old 12V power supply and the CRO.

First trace. There was a lot of motor controller PWM noise but the vibration waveform was clear. I later added a 500Hz single pole RC filter which cleaned up the motor PWM noise - sorry not shown here. So the start point was 100mV P-P.
 I wrapped some masking tape around the motor end of the tailshaft and marked it in four sections. Then I applied a stainless steel hose clamp and tried all four sections to see if there was a change.
Results:
1 200mV
2 30mV
3 160mV
4 175mV
Then I tried in between but I couldn't do better than the result in number 2.
I increased my test speed to 4100 RPM (102 km/hr) and tried all again. The vibration increased to 50mV with the clamp in the best spot - about 1.8.
Picture here is with the clamp at about position 2.5.

I tried adding a small washer but there was a slightly worse result.
I tried cutting off 5mm of the protruding part of the clamp, but if anything, the result was slightly worse. It was hard to tell.
I'll drive it tomorrow.
I had bought a 3 axis accelerometer from eBay a few weeks ago and on Saturday I added some connectors and wires so I could select any of the 3 axis to test. I choose the 'Z' axis output set to high-sensitivity, and added some orange bluetack (yes, really) to the bottom of the PCB to hold it on the motor frame.
The bluetack colour got washed out on this picture as and appears white.
Up the Vogue went onto axle stands with the rear wheels removed for safety.
I cleaned some road dirt off the motor frame and stuck the accelerometer on.
First trace. There was a lot of motor controller PWM noise but the vibration waveform was clear. I later added a 500Hz single pole RC filter which cleaned up the motor PWM noise - sorry not shown here. So the start point was 100mV P-P.
Results:
1 200mV
2 30mV
3 160mV
4 175mV
Then I tried in between but I couldn't do better than the result in number 2.
I increased my test speed to 4100 RPM (102 km/hr) and tried all again. The vibration increased to 50mV with the clamp in the best spot - about 1.8.
Picture here is with the clamp at about position 2.5.
I tried adding a small washer but there was a slightly worse result.
I tried cutting off 5mm of the protruding part of the clamp, but if anything, the result was slightly worse. It was hard to tell.
So I left it at position 2.
Conclusion: It is possible to significantly improve the vibration problem.
Curiously, position 2 is where all the balance weights are currently welded.
Not sure what to do next - thinking...I'll drive it tomorrow.
Friday, March 7, 2014
Energy Usage per Month
I have noticed that the Vogue's range has increased during summer so I entered the AH used and the distance traveled for each time the car was charged since I started routinely driving the Vogue back in April 2013 (I keep a log). The data was entered in a spreadsheet divided into columns of months.
I then simply divided the AH used by the distance and averaged these values for each month.
The range line (purple) is that figure divided into 16 - my pack is 20AH and 16 is 80% of the pack's AH capacity.
The result. (In Australia the hottest months are January/February - coldest is around June/July).
Energy usage per kilometer is on the way back up as it gets colder down under.
 (Edit: Graph updated again June 5th 2014)
It's not aligned but here is the temperature graph for where I live. The grey area is the rolling average.

Source of graph: http://weatherspark.com/history/34069/2013/Melbourne-Victoria-Australia
I then simply divided the AH used by the distance and averaged these values for each month.
The range line (purple) is that figure divided into 16 - my pack is 20AH and 16 is 80% of the pack's AH capacity.
The result. (In Australia the hottest months are January/February - coldest is around June/July).
It's not aligned but here is the temperature graph for where I live. The grey area is the rolling average.
Source of graph: http://weatherspark.com/history/34069/2013/Melbourne-Victoria-Australia
Wednesday, February 26, 2014
Seat Diaphragm failed AGAIN!
The driver seat base diaphragm has torn out completely along the rear edge.
It only lasted a few months since I replaced it here.
So I will be installing webbing on the weekend.
It wasn't too tight this time - loose if anything - but obviously something about the application doesn't suit the TR6 seat diaphragms.
I'll document the lengths etc. when I install the webbing - it's a cheaper way to go and will be a better result as the webbing will give slightly rather than tearing like the rubber diaphragms.
Some pics - this first picture is from last time.
 Last time it tore at the sides.
This time it simply ripped out two of the three metal anchors along the rear of the diaphragm. My feeling is that they are just not well made. The metal anchor strip was VERY close to the edge of the rubber and one of them just slid out.
I have packing material under the seat right now (stopping the upholstery from being under strain) so I couldn't get a picture but I did remove these from the aluminium strip that sits next to the seat frame. The one on the left has no rubber attached to speak of - the rubber just slid off either side of the metal.

BTW I weigh 81kg - it's not me!
More to come...
It only lasted a few months since I replaced it here.
So I will be installing webbing on the weekend.
It wasn't too tight this time - loose if anything - but obviously something about the application doesn't suit the TR6 seat diaphragms.
I'll document the lengths etc. when I install the webbing - it's a cheaper way to go and will be a better result as the webbing will give slightly rather than tearing like the rubber diaphragms.
Some pics - this first picture is from last time.
This time it simply ripped out two of the three metal anchors along the rear of the diaphragm. My feeling is that they are just not well made. The metal anchor strip was VERY close to the edge of the rubber and one of them just slid out.
I have packing material under the seat right now (stopping the upholstery from being under strain) so I couldn't get a picture but I did remove these from the aluminium strip that sits next to the seat frame. The one on the left has no rubber attached to speak of - the rubber just slid off either side of the metal.
BTW I weigh 81kg - it's not me!
More to come...
Monday, February 10, 2014
Hot Weather Driving
Someone asked me last week how the Vogue was coping with the hot weather.
"Disturbingly well" I answered.
There was only 4 days where I didn't drive the Vogue - it was 40 degrees C or over all four days (see previous post).
Last week it was high 30's but I drove the Vogue anyway. I have kind of decided that a predicted temperature of 40 degrees C or over is the only time I'll leave it at home in the shade.
Meanwhile the "disturbingly well" comment was because the range is well up on my winter range. It's generally 85 km to 80% DOD and sometimes hitting 90 km. Keep in mind that I made it through winter with no heater so this is the battery pack temperature causing the change.
The line out of Blade Runner haunts me: "the candle that burns twice as bright burns for half as long".
If the pack degradation due to temperature is inversely proportional to the range increase (not likely - nothing is ever that simple) then it's not so bad but it really would be nice to have shaded parking at work!
Tuesday, January 14, 2014
Not driving the Vogue this week - too hot.
This week in Melbourne we are looking at four consecutive days in the range 39 to 43 degrees C - The forecast.today is 43 degrees C. Tuesday to Friday goes 43, 39, 41, 40.
Since I do not have under cover parking at work, I decided to not have the Vogue roast in the sun for the week and have swapped it into the garage. There, it should at least stay below 35 degrees C and keep the battery temperatures the same as ambient air rather than the 50 odd degrres they would get to under the bonnet (and in the boot) if it were in the sun.
My daughter is away so I'm driving her car. I didn't drive the Vogue Monday either but that was because the Super Snipe - our caravan tow car, has just had an automatic transmission service (complete with some fluid leak fixes) and I wanted to drive a few kilometers before we commit to dragging the caravan around the state with it.
So the Vogue is in the garage with the two completely redundant drip trays under it while the Snipe sits in the carport hopefully not leaking either.
Subscribe to:
Posts (Atom)

